


Lapping delle sk video

A questo indirizzo č stata pubblicata una interessante guida al lapping delle schede video. Il lapping č quella tecnica che permette di livellare completamente la superficie di contatto di un chip e/o di un dissipatore di calore, ottenendo un miglior contatto tra le parti e, di conseguenza, un miglior trasferimento termico del calore generato dal chip.
I've done lapping here before, however recently I've been becoming tired with how much slower my secondary internet/lan rig seems to be getting in games. This system is maybe quite typical of many peoples computers, its a C366 @ 550, on a Soyo 7VCA with 128Mb of RAM and a V3 2000 overclocked to 170MHz. I wanted to give my machine a little more oomph without either having to upgrade to a Celeron 2 or getting a GeForce - both are too expensive. After my experiences pelterising a TnT2 I didn't really want to go to that much hassle again, I wanted a quick and simple way to get my V3 faster so I decided that since most video cards heatsinks are attached with crappy glue I'd start playing around with the V3's HS.
Before I go on I'd better warn you that doing this will void your warranty, however unless a store pops off the heatsink or you do a really messy job they probably wouldn't notice, however there is great potential for destroying your video card.
The first thing to do is to take the heatsink off. If you've never done this before it can be quite scarry, its also the bit where you'll have the most risk of destroying your card. You'll need a flat headed screw driver and some masking tape to do this. Firstly put masking tape all round the video chip, this is to ensure that if your screwdriver slips it might not scrape away a connection on the PCB. I tried to take a pic of this next stage but trying to hold a camera in one hand, a screw driver in the other and taking good quality pics is a no no. Basically what you do is put the flat head of the screw driver underneath the heatsink then twist or leaver it upwards. You may find that it helps if the heatsink is hot - and the glue therefore softer, either use you mums hairdryer or play a couple of rounds of Quake 3 before starting. It'll take some force but suddenly the heatsink will "pop" off, you may get an image something like this - as usual images are clickable for a bigger view.
 ASUS ProArt 1, un PC completo ad altissime prestazioni per creator e non solo
 OPPO Reno11 F 5G: vuole durare più di tutti! La recensione
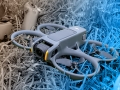
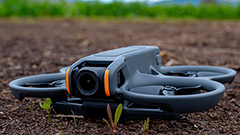 DJI Avata 2: il drone FPV accessibile ancora più sicuro e divertente
 Clamorosa decisione di Alfa Romeo: "non va bene Milano? Allora si chiamerà Junior"
 Due super mini PC Ryzen 7 5700U, 32GB RAM e SSD PCIe 512GB a 379€, non c'è nulla di meglio in tutta Amazon
 PaintCam Eve, la telecamera di sicurezza che gioca a paintball con gli intrusi
 Quest nelle scuole: il visore di realtà virtuale di Meta punta al mondo dell'istruzione
 Mars Sample Return: slitta la missione NASA ed ESA per portare i campioni di Marte sulla Terra
 Iron Man e Black Panther: i nuovi giochi sviluppati da EA saranno open world
 Anche Bill Gates è preoccupato per i posti di lavoro sottratti dall'intelligenza artificiale, incluso il suo
 Novità per Fortinet: arriva una nuova versione di FortiOS e si aggiorna Fortinet Security Fabric
 Acquistare un videogioco digitale non vuol dire possederlo: Ubisoft lo dimostra con The Crew
 Vivi la finale di UEFA Champions League con Claudio Marchisio. La promo di OPPO per chi acquista uno smartphone
 Arrivano in Italia HUAWEI Band 9 e la serie nova 12: specifiche e prezzi
 CPU Intel Core Ultra nei notebook HUAWEI, i politici USA non l'hanno presa bene


0 Commenti
Gli autori dei commenti, e non la redazione, sono responsabili dei contenuti da loro inseriti - infoDevi effettuare il login per poter commentare
Se non sei ancora registrato, puoi farlo attraverso questo form.
Se sei già registrato e loggato nel sito, puoi inserire il tuo commento.
Si tenga presente quanto letto nel regolamento, nel rispetto del "quieto vivere".